常用控件
基本布局
LinearLayout
LinearLayout又称作线性布局,这个布局会将它所包含的控件在线性方向上依次排列。
通过这个属性android:orientation="versical"/android:orientation="horizontal"来执行布局是垂直方向排列还是水平方向排列。默认方向是水平方向
这个布局中有两个重要的属性:
(1)android:layout_gravity属性和android:gravity属性有什么区别?
- android:gravity用于指定文字在控件中的对齐方式(top、bottom、start、end、center等,可以用“|”来同时指定多个值)
- android:layout_gravity用于指定控件在布局中的对齐方式
但是需要注意,当LinearLayout的排列方向是horizontal时,只有垂直方向上的对齐方式才会生效。因为此时水平方向上的长度是不固定的,每添加一个控件,水平方向上的长度都会改变,因而无法指定该方向上的对齐方式。同样的道理,当LinearLayout的排列方向是vertical时,只有水平方向上的对齐方式才会生效。
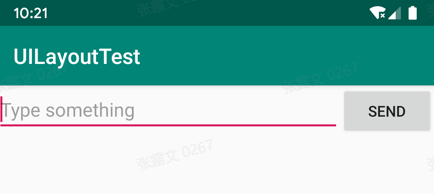
(2)LinearLayout中的另一个重要属性—android:layout_weight
这个属性允许我们使用比例的方式来指定控件的大小,它在手机屏幕的适配性方面可以起到非常重要的作用
1
2
3
4
5
6
7
8
9
10
11
12
13
14
15
16
17
18
19
20
21
22
| <LinearLayout xmlns:android="http://schemas.android.com/apk/res/android"
android:orientation="horizontal"
android:layout_width="match_parent"
android:layout_height="match_parent">
<EditText
android:id="@+id/input_message"
android:layout_width="0dp"
android:layout_height="wrap_content"
android:layout_weight="1"
android:hint="Type something"
/>
<Button
android:id="@+id/send"
android:layout_width="0dp"
android:layout_height="wrap_content"
android:layout_weight="1"
android:text="Send"
/>
</LinearLayout>
|
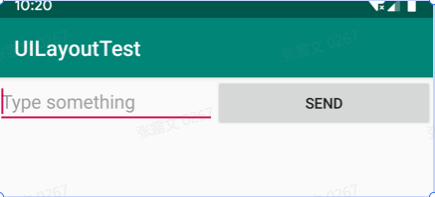
同时指定为1平分屏幕宽度,
其实原理很简单,将LinearLayout下所有控件的layout_weight值相加,得到一个总值,然后每个控件所占大小的比例就是用该控件的layout_weight值除以刚才算出的总值。上面就是1/2和1/2。因此平分。
还可以通过指定部分控件的layout_weight值来实现更好的效果
1
2
3
4
5
6
7
8
9
10
11
12
13
14
15
16
17
18
19
20
21
| <LinearLayout xmlns:android="http://schemas.android.com/apk/res/android"
android:orientation="horizontal"
android:layout_width="match_parent"
android:layout_height="match_parent">
<EditText
android:id="@+id/input_message"
android:layout_width="0dp"
android:layout_height="wrap_content"
android:layout_weight="1"
android:hint="Type something"
/>
<Button
android:id="@+id/send"
android:layout_width="wrap_content"
android:layout_height="wrap_content"
android:text="Send"
/>
</LinearLayout>
|
RelativeLayout
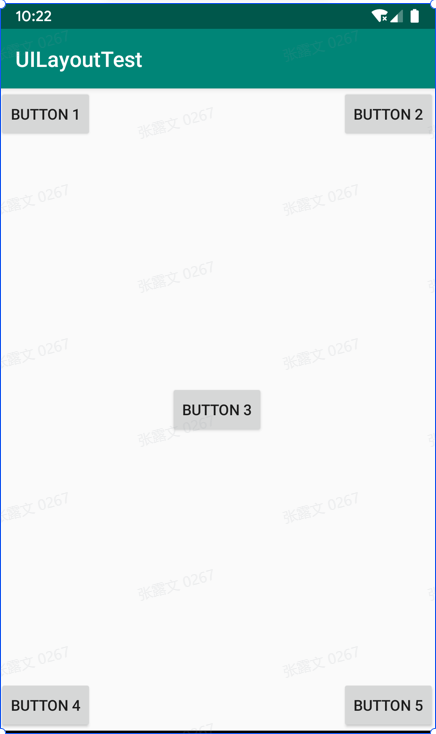
相对布局,RelativeLayout显得更加随意,它可以通过相对定位的方式让控件出现在布局的任何位置,因此RelativeLayout中的属性非常多,不过都是有规律可循的。
(1)控件相当于父布局定位
1
2
3
4
5
6
7
8
9
10
11
12
13
14
15
16
17
18
19
20
21
22
23
24
25
26
27
28
29
30
31
32
33
34
35
36
37
38
39
40
41
42
43
44
| <RelativeLayout xmlns:android="http://schemas.android.com/apk/res/android"
android:layout_width="match_parent"
android:layout_height="match_parent">
<Button
android:id="@+id/button1"
android:layout_width="wrap_content"
android:layout_height="wrap_content"
android:layout_alignParentLeft="true"
android:layout_alignParentTop="true"
android:text="Button 1" />
<Button
android:id="@+id/button2"
android:layout_width="wrap_content"
android:layout_height="wrap_content"
android:layout_alignParentRight="true"
android:layout_alignParentTop="true"
android:text="Button 2" />
<Button
android:id="@+id/button3"
android:layout_width="wrap_content"
android:layout_height="wrap_content"
android:layout_centerInParent="true"
android:text="Button 3" />
<Button
android:id="@+id/button4"
android:layout_width="wrap_content"
android:layout_height="wrap_content"
android:layout_alignParentBottom="true"
android:layout_alignParentLeft="true"
android:text="Button 4" />
<Button
android:id="@+id/button5"
android:layout_width="wrap_content"
android:layout_height="wrap_content"
android:layout_alignParentBottom="true"
android:layout_alignParentRight="true"
android:text="Button 5" />
</RelativeLayout>
|
(2)控件相对于控件定位
1
2
3
4
5
6
7
8
9
10
11
12
13
14
15
16
17
18
19
20
21
22
23
24
25
26
27
28
29
30
31
32
33
34
35
36
37
38
39
40
41
42
43
44
| <RelativeLayout xmlns:android="http://schemas.android.com/apk/res/android"
android:layout_width="match_parent"
android:layout_height="match_parent">
<Button
android:id="@+id/button3"
android:layout_width="wrap_content"
android:layout_height="wrap_content"
android:layout_centerInParent="true"
android:text="Button 3" />
<Button
android:id="@+id/button1"
android:layout_width="wrap_content"
android:layout_height="wrap_content"
android:layout_above="@id/button3"
android:layout_toLeftOf="@id/button3"
android:text="Button 1" />
<Button
android:id="@+id/button2"
android:layout_width="wrap_content"
android:layout_height="wrap_content"
android:layout_above="@id/button3"
android:layout_toRightOf="@id/button3"
android:text="Button 2" />
<Button
android:id="@+id/button4"
android:layout_width="wrap_content"
android:layout_height="wrap_content"
android:layout_below="@id/button3"
android:layout_toLeftOf="@id/button3"
android:text="Button 4" />
<Button
android:id="@+id/button5"
android:layout_width="wrap_content"
android:layout_height="wrap_content"
android:layout_below="@id/button3"
android:layout_toRightOf="@id/button3"
android:text="Button 5" />
</RelativeLayout>
|
FrameLayout
这种布局没有丰富的定位方式,所有的控件都会默认摆放在布局的左上角
1
2
3
4
5
6
7
8
9
10
11
12
13
14
15
16
17
18
19
| <FrameLayout xmlns:android="http://schemas.android.com/apk/res/android"
android:layout_width="match_parent"
android:layout_height="match_parent">
<TextView
android:id="@+id/textView"
android:layout_width="wrap_content"
android:layout_height="wrap_content"
android:text="This is TextView"
/>
<Button
android:id="@+id/button"
android:layout_width="wrap_content"
android:layout_height="wrap_content"
android:text="Button"
/>
</FrameLayout>
|
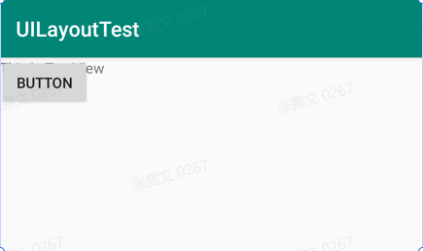
可以看到,文字和按钮都位于布局的左上角。由于Button是在TextView之后添加的,因此按钮压在了文字的上面。
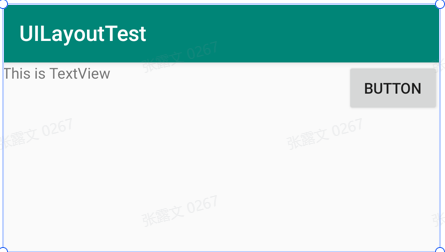
除了这种默认效果之外,我们还可以使用layout_gravity属性来指定控件在布局中的对齐方式
1
2
3
4
5
6
7
8
9
10
11
12
13
14
15
16
17
18
19
20
21
| <FrameLayout xmlns:android="http://schemas.android.com/apk/res/android"
android:layout_width="match_parent"
android:layout_height="match_parent">
<TextView
android:id="@+id/textView"
android:layout_width="wrap_content"
android:layout_height="wrap_content"
android:layout_gravity="left"
android:text="This is TextView"
/>
<Button
android:id="@+id/button"
android:layout_width="wrap_content"
android:layout_height="wrap_content"
android:layout_gravity="right"
android:text="Button"
/>
</FrameLayout>
|
引入布局
拿标题栏举例,一般我们程序中可能有多个Activity需要这样的标题栏,如果在每个Activity的布局中都编写一遍同样的标题栏代码,明显就会导致代码的大量重复。这时我们就可以使用引入布局的方式来解决这个问题
建立title.xml
1
2
3
4
5
6
7
8
9
10
11
12
13
14
15
16
17
18
19
20
21
22
23
24
25
26
27
28
29
30
31
32
33
34
35
36
37
| <LinearLayout xmlns:android="http://schemas.android.com/apk/res/android"
android:layout_width="match_parent"
android:layout_height="wrap_content"
android:background="@drawable/title_bg">
<Button
android:id="@+id/titleBack"
android:layout_width="wrap_content"
android:layout_height="wrap_content"
android:layout_gravity="center"
android:layout_margin="5dp"
android:background="@drawable/back_bg"
android:text="Back"
android:textColor="#fff" />
<TextView
android:id="@+id/titleText"
android:layout_width="0dp"
android:layout_height="wrap_content"
android:layout_gravity="center"
android:layout_weight="1"
android:gravity="center"
android:text="Title Text"
android:textColor="#fff"
android:textSize="24sp" />
<Button
android:id="@+id/titleEdit"
android:layout_width="wrap_content"
android:layout_height="wrap_content"
android:layout_gravity="center"
android:layout_margin="5dp"
android:background="@drawable/edit_bg"
android:text="Edit"
android:textColor="#fff" />
</LinearLayout>
|
android:layout_margin这个属性,它可以指定控件在上下左右方向上的间距
现在标题栏布局已经编写完成了,剩下的就是如何在程序中使用这个标题栏了
1
2
3
4
5
6
7
| <LinearLayout xmlns:android="http://schemas.android.com/apk/res/android"
android:layout_width="match_parent"
android:layout_height="match_parent" >
<include layout="@layout/title" />
</LinearLayout>
|
只需要一个include标签就把标题栏布局引入进来了。@layout/title 意味着引用了 res/layout 目录下名为 title.xml 的布局文件。
最后别忘了在MainActivity中将系统自带的标题栏隐藏掉
1
2
3
4
5
6
7
8
9
10
| class MainActivity : AppCompatActivity() {
override fun onCreate(savedInstanceState: Bundle?) {
super.onCreate(savedInstanceState)
setContentView(R.layout.activity_main)
supportActionBar?.hide()
}
}
|

自定义控件
引入布局的技巧确实解决了重复编写布局代码的问题,但是如果布局中有一些控件要求能够响应事件,我们还是需要在每个Activity中为这些控件单独编写一次事件注册的代码,无疑会增加很多重复代码,这种情况最好是使用自定义控件的方式来解决。
新建TitleLayout继承自LinearLayout,让它成为我们自定义的标题栏控件
1
2
3
4
5
6
7
8
9
10
11
12
13
14
15
16
17
18
19
| class TitleLayout(context: Context, attrs: AttributeSet) : LinearLayout(context, attrs) {
init {
LayoutInflater.from(context).inflate(R.layout.title, this)
titleBack.setOnClickListener {
val activity = context as Activity
activity.finish()
}
titleEdit.setOnClickListener {
Toast.makeText(context, "You clicked Edit button", Toast.LENGTH_SHORT).show()
}
}
}
|
需要在布局文件中添加这个自定义控件:
1
2
3
4
5
6
7
8
9
10
| <LinearLayout xmlns:android="http://schemas.android.com/apk/res/android"
android:layout_width="match_parent"
android:layout_height="match_parent" >
<com.example.uicustomviews.TitleLayout
android:layout_width="match_parent"
android:layout_height="wrap_content" />
</LinearLayout>
|
自定义控件就完成啦,这样的话,每当我们在一个布局中引入TitleLayout时,返回按钮和编辑按钮的点击事件就已经自动实现好了,这就省去了很多编写重复代码的工作。
强大的滚动控件:RecyclerView
定义一个实体类,新建Fruit类
1
2
|
class Fruit(val name:String, val imageId: Int)
|
然后需要为RecyclerView的子项指定一个我们自定义的布局,在layout目录下新建fruit_item.xml
1
2
3
4
5
6
7
8
9
10
11
12
13
14
15
16
17
18
19
| <LinearLayout xmlns:android="http://schemas.android.com/apk/res/android"
android:layout_width="match_parent"
android:layout_height="60dp">
<ImageView
android:id="@+id/fruitImage"
android:layout_width="40dp"
android:layout_height="40dp"
android:layout_gravity="center_vertical"
android:layout_marginLeft="10dp"/>
<TextView
android:id="@+id/fruitName"
android:layout_width="wrap_content"
android:layout_height="wrap_content"
android:layout_gravity="center_vertical"
android:layout_marginLeft="10dp" />
</LinearLayout>
|
接下来需要为RecyclerView准备一个适配器,新建FruitAdapter类,让这个适配器继承自RecyclerView.Adapter,并将泛型指定为FruitAdapter.ViewHolder。其中,ViewHolder是我们在FruitAdapter中定义的一个内部类
1
2
3
4
5
6
7
8
9
10
11
12
13
14
15
16
17
18
19
20
21
22
23
24
25
26
27
28
29
30
31
32
| class FruitAdapter(val fruitList: List<Fruit>) :
RecyclerView.Adapter<FruitAdapter.ViewHolder>() {
inner class ViewHolder(view: View) : RecyclerView.ViewHolder(view) {
val fruitImage: ImageView = view.findViewById(R.id.fruitImage)
val fruitName: TextView = view.findViewById(R.id.fruitName)
}
override fun onCreateViewHolder(parent: ViewGroup, viewType: Int): ViewHolder {
val view = LayoutInflater.from(parent.context)
.inflate(R.layout.fruit_item, parent, false)
return ViewHolder(view)
}
override fun onBindViewHolder(holder: ViewHolder, position: Int) {
val fruit = fruitList[position]
holder.fruitImage.setImageResource(fruit.imageId)
holder.fruitName.text = fruit.name
}
override fun getItemCount() = fruitList.size
}
|
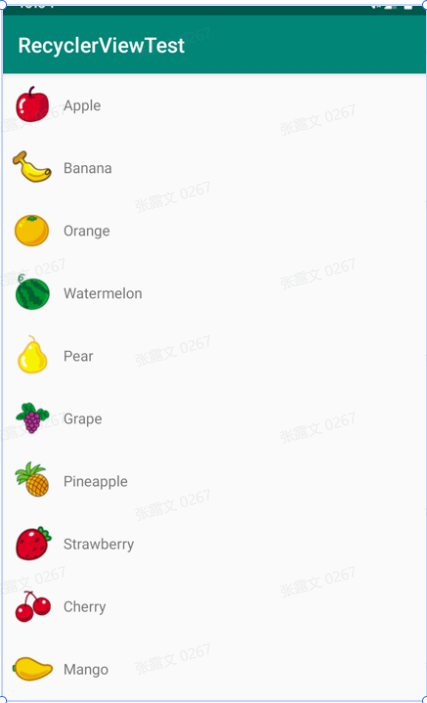
适配器准备好了之后,我们就可以开始使用RecyclerView了
1
2
3
4
5
6
7
8
9
10
11
12
13
14
15
16
17
18
19
20
21
22
23
24
25
26
27
28
29
30
31
32
| class MainActivity : AppCompatActivity() {
private val fruitList = ArrayList<Fruit>()
override fun onCreate(savedInstanceState: Bundle?) {
super.onCreate(savedInstanceState)
setContentView(R.layout.activity_main)
initFruits()
val layoutManager = LinearLayoutManager(this)
recyclerView.layoutManager = layoutManager
val adapter = FruitAdapter(fruitList)
recyclerView.adapter = adapter
}
private fun initFruits() {
repeat(2) {
fruitList.add(Fruit("Apple", R.drawable.apple_pic))
fruitList.add(Fruit("Banana", R.drawable.banana_pic))
fruitList.add(Fruit("Orange", R.drawable.orange_pic))
fruitList.add(Fruit("Watermelon", R.drawable.watermelon_pic))
fruitList.add(Fruit("Pear", R.drawable.pear_pic))
fruitList.add(Fruit("Grape", R.drawable.grape_pic))
fruitList.add(Fruit("Pineapple", R.drawable.pineapple_pic))
fruitList.add(Fruit("Strawberry", R.drawable.strawberry_pic))
fruitList.add(Fruit("Cherry", R.drawable.cherry_pic))
fruitList.add(Fruit("Mango", R.drawable.mango_pic))
}
}
}
|
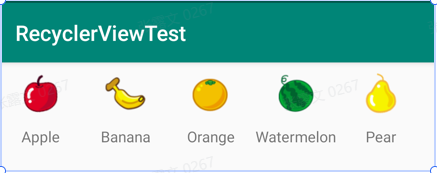
RecyclerView还支持横向滚动,这时就要把水果元素改成垂直排列才合理
1
2
3
4
5
6
7
8
9
10
11
12
13
14
15
16
17
18
19
20
| <LinearLayout xmlns:android="http://schemas.android.com/apk/res/android"
android:orientation="vertical"
android:layout_width="80dp"
android:layout_height="wrap_content">
<ImageView
android:id="@+id/fruitImage"
android:layout_width="40dp"
android:layout_height="40dp"
android:layout_gravity="center_horizontal"
android:layout_marginTop="10dp" />
<TextView
android:id="@+id/fruitName"
android:layout_width="wrap_content"
android:layout_height="wrap_content"
android:layout_gravity="center_horizontal"
android:layout_marginTop="10dp" />
</LinearLayout>
|
我们将ImageView和TextView都设置成了在布局中水平居中,并且使用layout_marginTop属性让文字和图片之间保持一定距离,接下来修改MainActivity中的代码
1
2
3
4
5
6
7
8
9
10
11
12
13
14
15
16
| class MainActivity : AppCompatActivity() {
private val fruitList = ArrayList<Fruit>()
override fun onCreate(savedInstanceState: Bundle?) {
super.onCreate(savedInstanceState)
setContentView(R.layout.activity_main)
initFruits()
val layoutManager = LinearLayoutManager(this)
layoutManager.orientation = LinearLayoutManager.HORIZONTAL
recyclerView.layoutManager = layoutManager
val adapter = FruitAdapter(fruitList)
recyclerView.adapter = adapter
}
...
}
|
除了LinearLayoutManager之外,RecyclerView还给我们提供了GridLayoutManager和StaggeredGridLayoutManager这两种内置的布局排列方式。
- GridLayoutManager可以用于实现网格布局
- StaggeredGridLayoutManager可以用于实现瀑布流布局
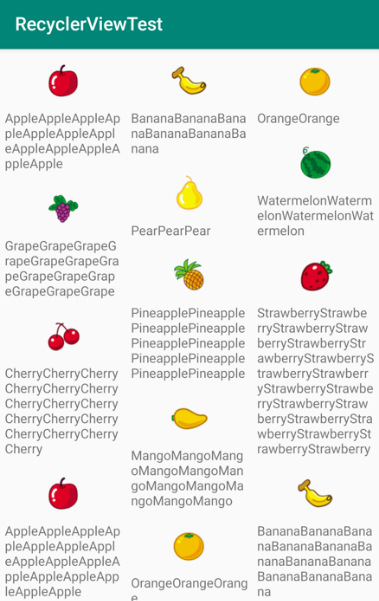
下面进行演示瀑布流布局:
修改fruit_item.xml
1
2
3
4
5
6
7
8
9
10
11
12
13
14
15
16
17
18
19
20
21
| <LinearLayout xmlns:android="http://schemas.android.com/apk/res/android"
android:orientation="vertical"
android:layout_width="match_parent"
android:layout_height="wrap_content"
android:layout_margin="5dp">
<ImageView
android:id="@+id/fruitImage"
android:layout_width="40dp"
android:layout_height="40dp"
android:layout_gravity="center_horizontal"
android:layout_marginTop="10dp" />
<TextView
android:id="@+id/fruitName"
android:layout_width="wrap_content"
android:layout_height="wrap_content"
android:layout_gravity="left"
android:layout_marginTop="10dp" />
</LinearLayout>
|
LinearLayout的宽度改为match_parent,因为瀑布流布局是根据布局的列数来自动适配的。
接着修改MainActivity中的代码
1
2
3
4
5
6
7
8
9
10
11
12
13
14
15
16
17
18
19
20
21
22
23
24
25
26
27
28
29
30
31
32
33
34
35
36
37
38
39
40
41
42
43
44
45
46
47
48
49
50
51
52
| class MainActivity : AppCompatActivity() {
private val fruitList = ArrayList<Fruit>()
override fun onCreate(savedInstanceState: Bundle?) {
super.onCreate(savedInstanceState)
setContentView(R.layout.activity_main)
initFruits()
val layoutManager = StaggeredGridLayoutManager(3,
StaggeredGridLayoutManager.VERTICAL)
recyclerView.layoutManager = layoutManager
val adapter = FruitAdapter(fruitList)
recyclerView.adapter = adapter
}
private fun initFruits() {
repeat(2) {
fruitList.add(Fruit(getRandomLengthString("Apple"),
R.drawable.apple_pic))
fruitList.add(Fruit(getRandomLengthString("Banana"),
R.drawable.banana_pic))
fruitList.add(Fruit(getRandomLengthString("Orange"),
R.drawable.orange_pic))
fruitList.add(Fruit(getRandomLengthString("Watermelon"),
R.drawable.watermelon_pic))
fruitList.add(Fruit(getRandomLengthString("Pear"),
R.drawable.pear_pic))
fruitList.add(Fruit(getRandomLengthString("Grape"),
R.drawable.grape_pic))
fruitList.add(Fruit(getRandomLengthString("Pineapple"),
R.drawable.pineapple_pic))
fruitList.add(Fruit(getRandomLengthString("Strawberry"),
R.drawable.strawberry_pic))
fruitList.add(Fruit(getRandomLengthString("Cherry"),
R.drawable.cherry_pic))
fruitList.add(Fruit(getRandomLengthString("Mango"),
R.drawable.mango_pic))
}
}
private fun getRandomLengthString(str: String): String {
val n = (1..20).random()
val builder = StringBuilder()
repeat(n) {
builder.append(str)
}
return builder.toString()
}
}
|
RecyclerView的点击事件
1
2
3
4
5
6
7
8
9
10
11
12
13
14
15
16
17
18
19
20
21
22
23
| class FruitAdapter(val fruitList: List<Fruit>) :
RecyclerView.Adapter<FruitAdapter.ViewHolder>() {
...
override fun onCreateViewHolder(parent: ViewGroup, viewType: Int): ViewHolder {
val view = LayoutInflater.from(parent.context)
.inflate(R.layout.fruit_item, parent, false)
val viewHolder = ViewHolder(view)
viewHolder.itemView.setOnClickListener {
val position = viewHolder.adapterPosition
val fruit = fruitList[position]
Toast.makeText(parent.context, "you clicked view ${fruit.name}",
Toast.LENGTH_SHORT).show()
}
viewHolder.fruitImage.setOnClickListener {
val position = viewHolder.adapterPosition
val fruit = fruitList[position]
Toast.makeText(parent.context, "you clicked image ${fruit.name}",
Toast.LENGTH_SHORT).show()
}
return viewHolder
}
...
}
|
