Android中一些常用的多媒体功能的使用技巧。
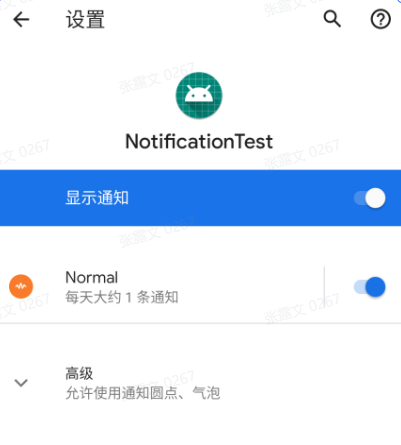
通知 应用程序如果想要发出通知,也必须创建自己的通知渠道才行
创建
(1)首先需要一个NotificationManager对通知进行管理
(2)接下来要使用NotificationChannel类构建一个通知渠道,并调用NotificationManager的createNotificationChannel()完成创建。
1 2 3 4 5 6 7 8 9 10 val manager = getSystemService(Context.NOTIFICATION_SERVICE) as NotificationManagerif (Build.VERSION.SDK_INT >= Build.VERSION_CODES.O) {val channel = NotificationChannel(channelId, channelName, importance)
1 2 3 4 5 6 7 8 9 val notification = NotificationCompat.Builder(context, channelId)"This is content title" )"This is content text" )1 , notification)
1
2
3
4
5
6
7
8
9
10
11
12
13
14
15
16
17
18
19
20
21
22
23
24
25
class MainActivity : AppCompatActivity override fun onCreate (savedInstanceState: Bundle ?) super .onCreate(savedInstanceState)val manager = getSystemService(Context.NOTIFICATION_SERVICE) as if (Build.VERSION.SDK_INT >= Build.VERSION_CODES.O) {val channel = NotificationChannel("normal" , "Normal" ,NotificationManager.val notification = NotificationCompat.Builder(this , "normal" )"This is content title" )"This is content text" )1 , notification)
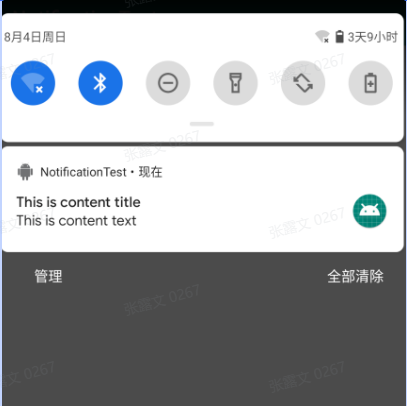
手机的应用通知中可以看到:
接下来,点击按钮,,可以看到状态栏有小图标,下拉可以看到通知详情
但目前点击通知内容没有反映,因为我们还没有实现这部分的功能,下面进行实现,
使用Pendntenting
1
2
3
4
5
6
7
8
9
10
11
12
13
14
15
16
17
18
19
20
class MainActivity : AppCompatActivity override fun onCreate (savedInstanceState: Bundle ?) val intent = Intent(this , NotificationActivity::class .java)val pi = PendingIntent.getActivity(this , 0 , intent, 0 )val notification = NotificationCompat.Builder(this , "normal" )"This is content title" )"This is content text" )1 , notification)
但点击之后图标还没有消失,下面在代码中实现,点击通知后图标消失
1 2 3 4 5 6 7 8 9 10 11 12 13 14 15 16 17 18 val notification = NotificationCompat.Builder(this , "normal" )true )class NotificationActivity : AppCompatActivity override fun onCreate (savedInstanceState: Bundle ?) super .onCreate(savedInstanceState)val manager = getSystemService(Context.NOTIFICATION_SERVICE) as 1 )
通知的进阶技巧
(1)setStyle()方法,这个方法允许我们构建出富文本的通知内容
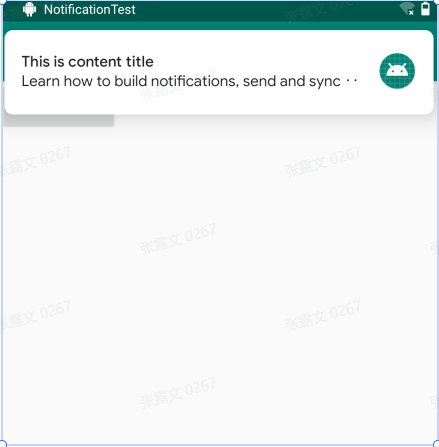
当通知的内容很多,通知内容是无法完整显示的,多余的部分会用省略号代替。但是如果你真的非常需要在通知当中显示一段长文字,Android也是支持的,通过setStyle()方法就可以做到
1
2
3
4
5
6
val notification = NotificationCompat.Builder(this , "normal" )"Learn how to build notifications, send and sync data, and use voice actions. Get the official Android IDE and developer tools to build apps for Android." ))
使用了setStyle()方法替代setContentText()方法
除了显示长文字之外,通知里还可以显示一张大图片
1
2
3
4
5
val notification = NotificationCompat.Builder(this , "normal" )
通过BitmapFactory的decodeResource()方法将图片解析成Bitmap对象
(2)通知渠道的重要等级
就是通知渠道的重要等级越高,发出的通知就越容易获得用户的注意。比如高重要等级的通知渠道发出的通知可以弹出横幅、发出声音,而低重要等级的通知渠道发出的通知不仅可能会在某些情况下被隐藏,而且可能会被改变显示的顺序,将其排在更重要的通知之后。
由于通知渠道一旦创建就不能再通过代码修改了。既然无法修改之前创建的通知渠道,那么我们就只好再创建一个新的通知渠道来测试了
1
2
3
4
5
6
7
8
9
10
11
12
13
14
15
16
17
18
19
class MainActivity : AppCompatActivity() {onCreate (savedInstanceState: Bundle?) {if (Build.VERSION.SDK_INT >= Build.VERSION_CODES.O) {val channel2 = NotificationChannel("important" , "Important" ,val intent = Intent(this , NotificationActivity::class.java)val pi = PendingIntent.getActivity(this , 0 , intent, 0 )val notification = NotificationCompat.Builder(this , "important" )
调用摄像头和相册 我们平时在使用QQ或微信的时候经常要和别人分享图片,这些图片可以是用手机摄像头拍的,也可以是从相册中选取的。这样的功能实在是太常见了,几乎是应用程序必备的功能,那么本节我们就学习一下调用摄像头和相册方面的知识。
(1)调用摄像头
举例:点击按钮,启动照相机,拍照,将拍下来的图片展示到按钮的下面
1
2
3
4
5
6
7
8
9
10
11
12
13
14
15
16
17
18
19
20
21
22
23
24
25
26
27
28
29
30
31
32
33
34
35
36
37
38
39
40
41
42
43
44
45
46
47
48
49
50
51
52
53
54
55
56
57
58
59
60
61
62
63
64
65
66
67
68
69
class MainActivity : AppCompatActivity val takePhoto = 1 lateinit var imageUri: Urilateinit var outputImage: Fileoverride fun onCreate (savedInstanceState: Bundle ?) super .onCreate(savedInstanceState)"output_image.jpg" )if (outputImage.exists()) {if (Build.VERSION.SDK_INT >= Build.VERSION_CODES.N) {this , "com.example.cameraalbumtest. fileprovider" , outputImage)else {val intent = Intent("android.media.action.IMAGE_CAPTURE" )override fun onActivityResult (requestCode: Int , resultCode: Int , data : Intent ?) super .onActivityResult(requestCode, resultCode, data )when (requestCode) {if (resultCode == Activity.RESULT_OK) {val bitmap = BitmapFactory.decodeStream(contentResolver.private fun rotateIfRequired (bitmap: Bitmap ) val exif = ExifInterface(outputImage.path)val orientation = exif.getAttributeInt(ExifInterface.TAG_ORIENTATION,return when (orientation) {90 )180 )270 )else -> bitmapprivate fun rotateBitmap (bitmap: Bitmap , degree: Int ) val matrix = Matrix()val rotatedBitmap = Bitmap.createBitmap(bitmap, 0 , 0 , bitmap.width, bitmap.height,true )return rotatedBitmap
具体来说,FileProvider.getUriForFile() 方法的参数包括:
context:当前上下文,通常是 Activity 或 Service 的实例。authority:FileProvider 的授权信息,即在 AndroidManifest.xml 文件中注册的 FileProvider 的 authorities 属性的值。file:要获取内容 URI 的文件对象。
调用 FileProvider.getUriForFile() 方法后,它会返回一个内容 URI,这个 URI 可以被其他应用程序访问,用于获取你的应用程序中指定文件的内容。
不过现在还没结束,刚才提到了ContentProvider,那么我们自然要在AndroidManifest.xml中对它进行注册才行
1
2
3
4
5
6
7
8
9
10
11
12
13
14
15
16
17
18
19
20
<manifest xmlns :android="http://schemas.android.com/apk/res/android" "com.example.cameraalbumtest" ><application android:allowBackup ="true" android:icon ="@mipmap/ic_launcher" android:label ="@string/app_name" android:supportsRtl ="true" android:theme ="@style/AppTheme" > ... <provider android:name ="androidx.core.content.FileProvider" android:authorities ="com.example.cameraalbumtest.fileprovider" android:exported ="false" android:grantUriPermissions ="true" > <meta-data android:name ="android.support.FILE_PROVIDER_PATHS" android:resource ="@xml/file_paths" /> </provider > </application >
这里还在<provider>标签的内部使用<meta-data>指定Uri的共享路径,并引用了一个@xml/file_paths资源。
右击res目录→New→Directory,创建一个xml目录,接着右击xml目录→New→File,创建一个file_paths.xml文件。然后修改file_paths.xml文件中的内容
1
2
3
4
<?xml version="1.0" encoding="utf-8" ?><paths xmlns:android ="http://schemas.android.com/apk/res/android" > <external-path name ="my_images" path ="/" /> </paths >
external-path就是用来指定Uri共享路径的,name属性的值可以随便填,path属性的值表示共享的具体路径,这里使用一个单斜线表示将整个SD卡进行共享,当然你也可以仅共享存放output_image.jpg这张图片的路径。
(2)从相册中选择图片
1
2
3
4
5
6
7
8
9
10
11
12
13
14
15
16
17
18
19
20
21
22
23
24
25
26
27
28
29
30
31
32
33
34
35
36
37
38
39
40
class MainActivity : AppCompatActivity val fromAlbum = 2 override fun onCreate (savedInstanceState: Bundle ?) val intent = Intent(Intent.ACTION_OPEN_DOCUMENT)"image/ *" override fun onActivityResult (requestCode: Int , resultCode: Int , data : Intent ?) super .onActivityResult(requestCode, resultCode, data )when (requestCode) {if (resultCode == Activity.RESULT_OK && data != null ) {data .data ?.let { uri ->val bitmap = getBitmapFromUri(uri)private fun getBitmapFromUri (uri: Uri ) "r" )?.use {
播放多媒体文件 (1)播放音频
在Android中播放音频文件一般是使用MediaPlayer类实现的,它对多种格式的音频文件提供了非常全面的控制方法,从而使播放音乐的工作变得十分简单。
首先来创建assets目录吧,它必须创建在app/src/main这个目录下面,也就是和java、res这两个目录是平级的。右击app/src/main→New→Directory,在弹出的对话框中输入“assets”,目录就创建完成了。将音频放入到此目录中
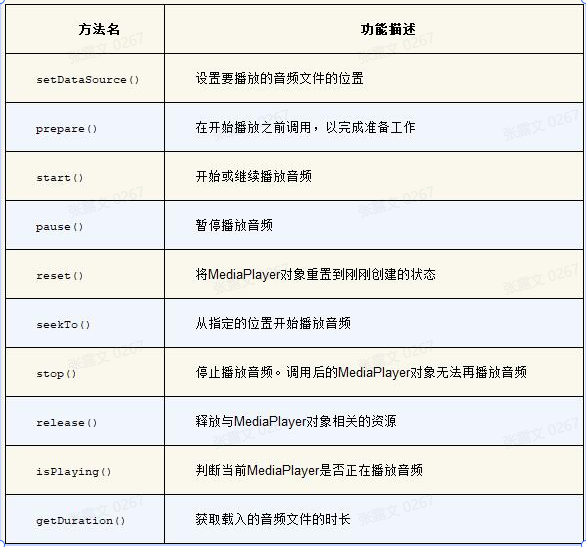
使用流程: 首先需要创建一个MediaPlayer对象,然后调用setDataSource()方法设置音频文件的路径,再调用prepare()方法使MediaPlayer进入准备状态,接下来调用start()方法就可以开始播放音频,调用pause()方法就会暂停播放,调用reset()方法就会停止播放。
1
2
3
4
5
6
7
8
9
10
11
12
13
14
15
16
17
18
19
20
21
22
23
24
25
26
27
28
29
30
31
32
33
34
35
36
37
38
39
40
class MainActivity : AppCompatActivity private val mediaPlayer = MediaPlayer()override fun onCreate (savedInstanceState: Bundle ?) super .onCreate(savedInstanceState)if (!mediaPlayer.isPlaying) {if (mediaPlayer.isPlaying) {if (mediaPlayer.isPlaying) {private fun initMediaPlayer () val assetManager = assetsval fd = assetManager.openFd("music.mp3" )override fun onDestroy () super .onDestroy()
在initMediaPlayer()方法中,首先通过getAssets()方法得到了一个AssetManager的实例,AssetManager可用于读取assets目录下的任何资源。
调用reset()方法将MediaPlayer重置为刚刚创建的状态,然后重新调用一遍initMediaPlayer()方法
(2)播放视频
主要是使用VideoView类来实现的。这个类将视频的显示和控制集于一身,我们仅仅借助它就可以完成一个简易的视频播放器。
VideoView不支持直接播放assets目录下的视频资源,而是使用res目录下允许我们再创建一个raw目录,像诸如音频、视频之类的资源文件也可以放在这里,并且VideoView是可以直接播放这个目录下的视频资源的。将视频资源放入这个文件夹中。
1
2
3
4
5
6
7
8
9
10
11
12
13
14
15
16
17
18
19
20
21
22
23
24
25
26
27
28
29
30
class MainActivity : AppCompatActivity override fun onCreate (savedInstanceState: Bundle ?) super .onCreate(savedInstanceState)val uri = Uri.parse("android.resource://$packageName /${R.raw.video} " )if (!videoView.isPlaying) {if (videoView.isPlaying) {if (videoView.isPlaying) {override fun onDestroy () super .onDestroy()suspend ()
首先在onCreate()方法中调用了Uri.parse()方法,将raw目录下的video.mp4文件解析成了一个Uri对象,这里使用的写法是Android要求的固定写法。然后调用VideoView的setVideoURI()方法将刚才解析出来的Uri对象传入,这样VideoView就初始化完成了
注意:VideoView并不是一个万能的视频播放工具类,它在视频格式的支持以及播放效率方面都存在着较大的不足。所以,如果想要仅仅使用VideoView就编写出一个功能非常强大的视频播放器是不太现实的。