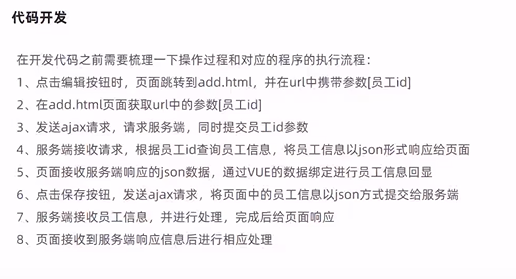
瑞吉外卖项目的功能和搭建

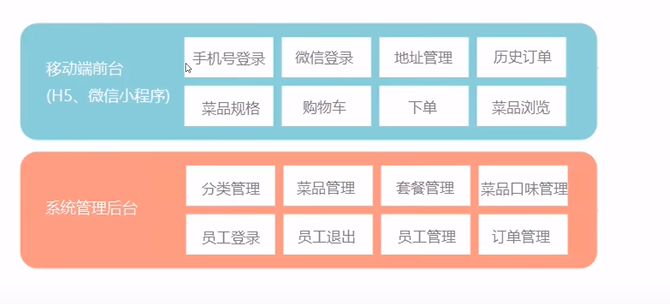
功能

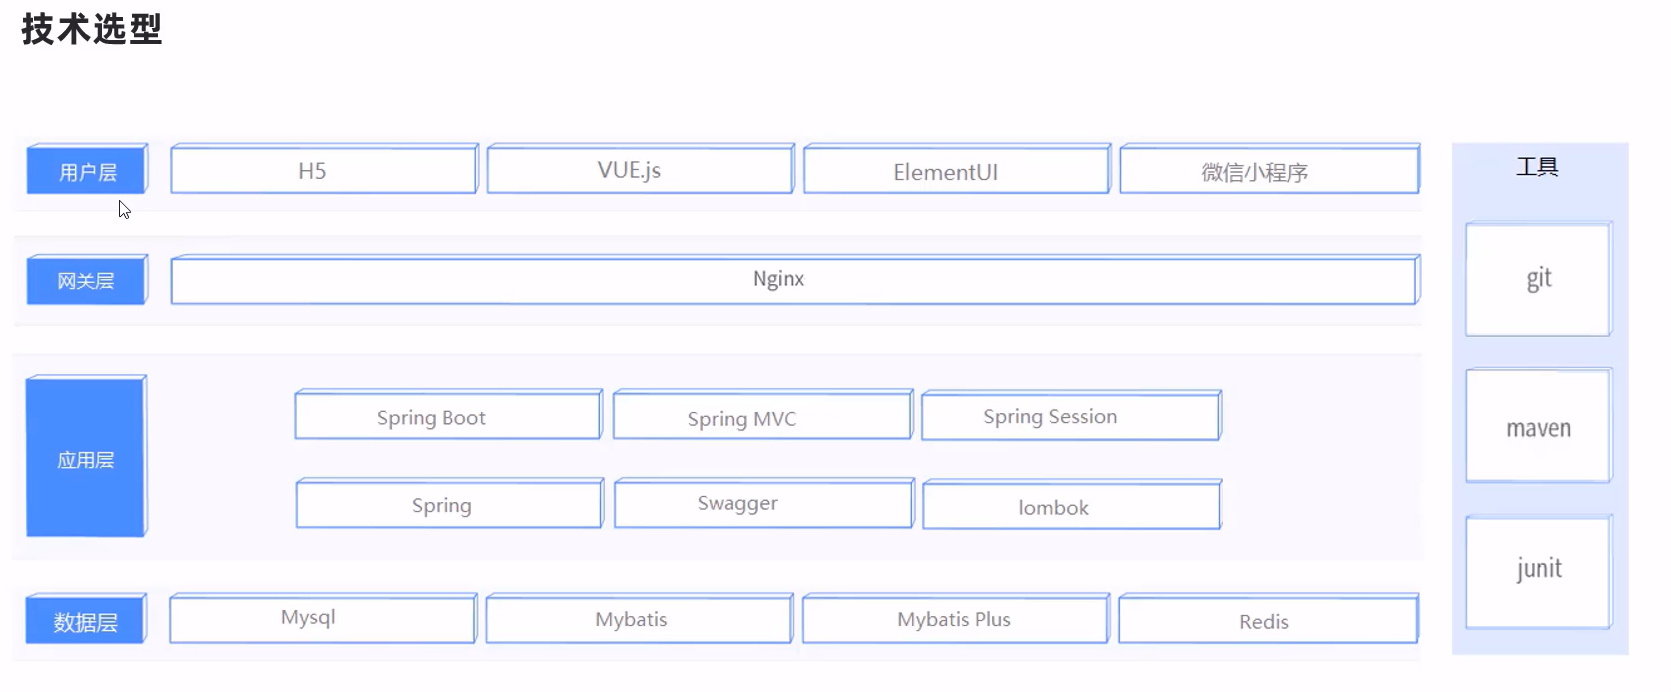
技术
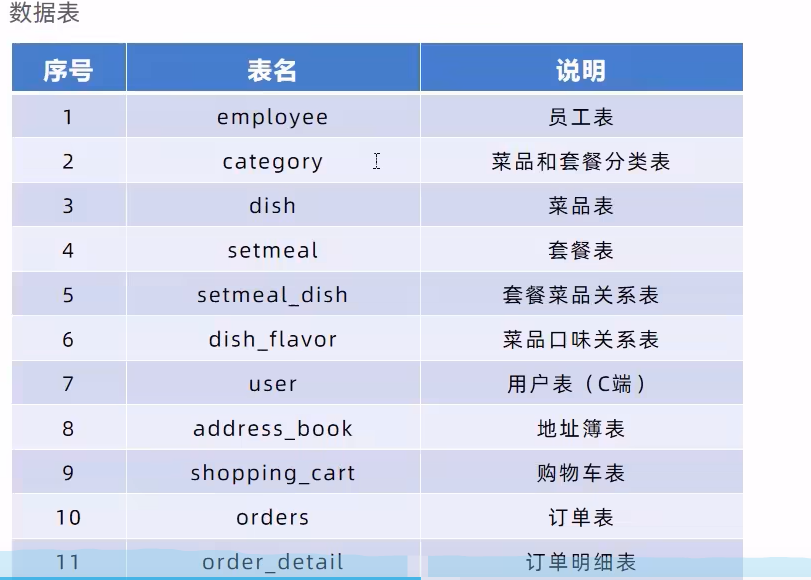
数据库表的信息
环境搭建
添加 依赖(pom.xml)
1
2
3
4
5
6
7
8
9
10
11
12
13
14
15
16
17
18
19
20
21
22
23
24
25
26
27
28
29
30
31
32
33
34
35
36
37
38
39
40
41
42
43
44
45
46
47
48
49
50
51
52
53
54
55
56
57
58
59
60
61
62
63
64
65
66
67
68
69
70
71
72
73
74
75
76
77
78
79
80
81
82
83
84
85
86
87
88
89
| <?xml version="1.0" encoding="UTF-8"?>
<project xmlns="http://maven.apache.org/POM/4.0.0"
xmlns:xsi="http://www.w3.org/2001/XMLSchema-instance"
xsi:schemaLocation="http://maven.apache.org/POM/4.0.0 http://maven.apache.org/xsd/maven-4.0.0.xsd">
<modelVersion>4.0.0</modelVersion>
<parent>
<groupId>org.springframework.boot</groupId>
<artifactId>spring-boot-starter-parent</artifactId>
<version>2.4.5</version>
<relativePath/> <!-- lookup parent from repository -->
</parent>
<groupId>com.zlw.reggie</groupId>
<artifactId>reggie_take_out</artifactId>
<version>1.0.0</version>
<properties>
<maven.compiler.source>8</maven.compiler.source>
<maven.compiler.target>8</maven.compiler.target>
</properties>
<dependencies>
<dependency>
<groupId>org.springframework.boot</groupId>
<artifactId>spring-boot-starter</artifactId>
</dependency>
<dependency>
<groupId>org.springframework.boot</groupId>
<artifactId>spring-boot-starter-test</artifactId>
<scope>test</scope>
</dependency>
<dependency>
<groupId>org.springframework.boot</groupId>
<artifactId>spring-boot-starter-web</artifactId>
<scope>compile</scope>
</dependency>
<dependency>
<groupId>com.baomidou</groupId>
<artifactId>mybatis-plus-boot-starter</artifactId>
<version>3.4.2</version>
</dependency>
<dependency>
<groupId>org.projectlombok</groupId>
<artifactId>lombok</artifactId>
<version>1.18.20</version>
</dependency>
<dependency>
<groupId>com.alibaba</groupId>
<artifactId>fastjson</artifactId>
<version>1.2.76</version>
</dependency>
<dependency>
<groupId>commons-lang</groupId>
<artifactId>commons-lang</artifactId>
<version>2.6</version>
</dependency>
<dependency>
<groupId>mysql</groupId>
<artifactId>mysql-connector-java</artifactId>
<scope>runtime</scope>
</dependency>
<dependency>
<groupId>com.alibaba</groupId>
<artifactId>druid-spring-boot-starter</artifactId>
<version>1.1.23</version>
</dependency>
</dependencies>
<build>
<plugins>
<plugin>
<groupId>org.springframework.boot</groupId>
<artifactId>spring-boot-maven-plugin</artifactId>
<version>2.4.5</version>
</plugin>
</plugins>
</build>
</project>
|
核心配置文件(application.yml)
1
2
3
4
5
6
7
8
9
10
11
12
13
14
15
16
17
18
19
| server:
port: 8080
spring:
application:
name: reggie_take_out #应用名称
datasource:
druid:
driver-class-name: com.mysql.cj.jdbc.Driver
url: jdbc:mysql:
username: root
password: Zlw0502
mybatis-plus:
configuration:
#在映射实体或者属性时,将数据库中表名和字段名中的下划线去掉,按照驼峰命名法映射
map-underscore-to-camel-case: true
log-impl: org.apache.ibatis.logging.stdout.StdOutImpl
global-config:
db-config:
id-type: ASSIGN_ID #自定义主键策略
|
静态资源解析(想要通过浏览器直接访问页面生效:http://localhost:8080/backend/index.html)
1
2
3
4
5
6
7
8
9
10
11
| @Configuration
public class WebMvcConfig extends WebMvcConfigurationSupport {
@Override
protected void addResourceHandlers(ResourceHandlerRegistry registry) {
registry.addResourceHandler("/backend/**").addResourceLocations("classpath:/backend/");
}
}
|
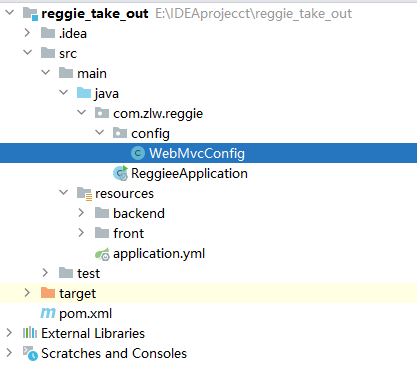
项目搭建好的结构
登录和退出实现
需求分析
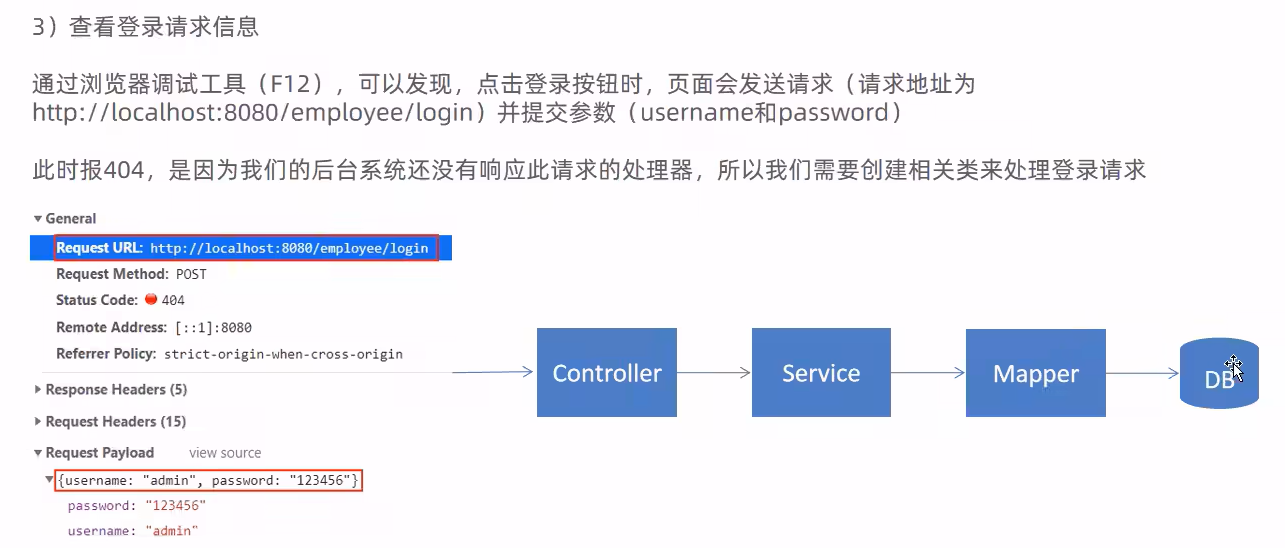
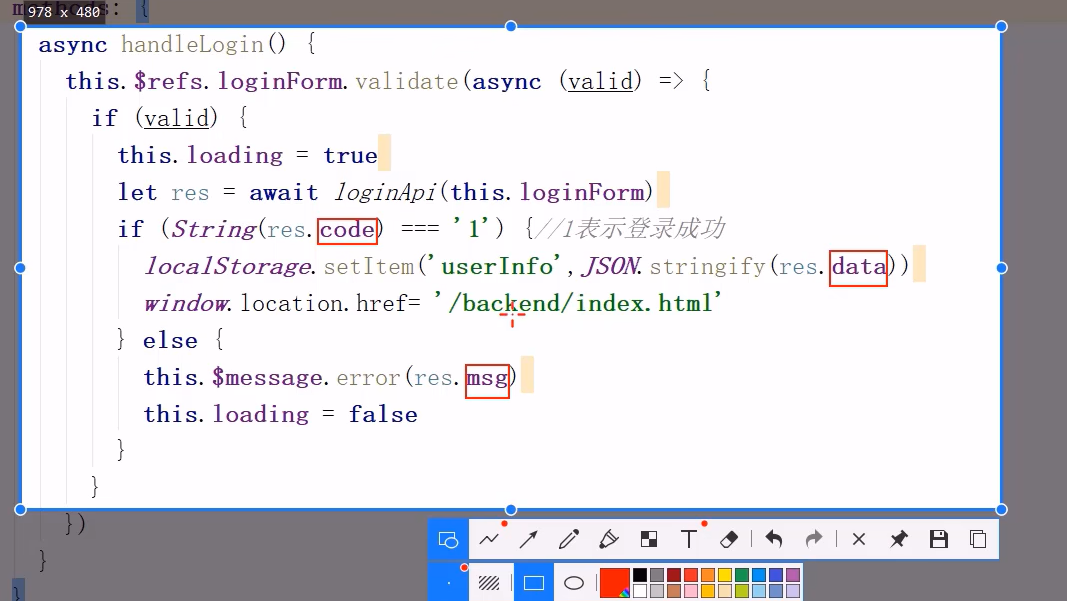
查看前端的页面代码,可以观察到,以下三个地方,也就是前端和后端所约定的一系列问题,就是后端所传过来的时候一定要带这三个变量,
代码实现
EmployeeController.java
1
2
3
4
5
6
7
8
9
10
11
12
13
14
15
16
17
18
19
20
21
22
23
24
25
26
27
28
29
30
31
32
33
34
35
36
37
38
39
40
41
42
43
44
45
46
47
48
49
50
51
52
53
54
55
| @RestController
@Slf4j
@RequestMapping("/employee")
public class EmployeeController {
@Autowired
private EmployeeService employeeService;
@PostMapping ("/login")
public R<Employee> login(HttpServletRequest request, @RequestBody Employee employee){
String password = employee.getPassword();
password = DigestUtils.md5DigestAsHex(password.getBytes());
LambdaQueryWrapper<Employee> queryWrapper = new LambdaQueryWrapper<>();
queryWrapper.eq(Employee::getUsername,employee.getUsername());
Employee emp = employeeService.getOne(queryWrapper);
if (emp==null){
return R.error("用户名不存在!");
}
if (!password.equals(emp.getPassword()))
{
return R.error("密码错误");
}
if (emp.getStatus()==0){
return R.error("用户被禁用");
}
request.getSession().setAttribute("employee",employee.getId());
return R.success(emp);
}
@RequestMapping("/logout")
public R<String> logout(HttpServletRequest request){
request.getSession().removeAttribute("employee");
return R.success("退出成功");
}
}
|
完善登录功能
如果不进行登录,直接访问url的时候,也可以进入主页面,这种设计很不合理。因此完善这个功能,当用户没有登录的时候,要跳转到登录页面。

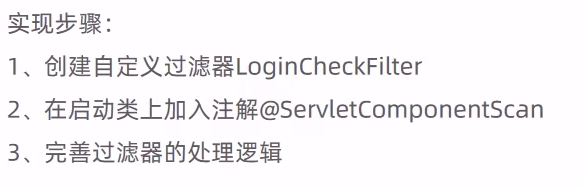
处理逻辑

在这里使用过滤器实现,并在过滤器类上添加@WebFilter(filterName = "loginCheckFilter", urlPatterns = "/*")注解。
在启动类上添加:@ServletComponentScan注解进行扫描,如果不加,则识别不了过滤器上面的注解。
在SpringBootApplication上使用@ServletComponentScan注解后,Servlet、Filter、Listener可以直接通过@WebServlet、@WebFilter、@WebListener注解自动注册,无需其他代码。https://blog.csdn.net/m0_37739193/article/details/85097477
代码为:
1
2
3
4
5
6
7
8
9
10
11
12
13
14
15
16
17
18
19
20
21
22
23
24
25
26
27
28
29
30
31
32
33
34
35
36
37
38
39
40
41
42
43
44
45
46
47
48
49
50
51
52
53
54
55
| @WebFilter(filterName = "loginCheckFilter", urlPatterns = "/*")
@Slf4j
public class LoginCheckFilter implements Filter {
public static final AntPathMatcher PATH_MATCHER = new AntPathMatcher();
@Override
public void doFilter(ServletRequest servletRequest, ServletResponse servletResponse, FilterChain filterChain) throws IOException, ServletException {
HttpServletRequest request = (HttpServletRequest) servletRequest;
HttpServletResponse response = (HttpServletResponse) servletResponse;
String requestURI = request.getRequestURI();
String [] s = new String[]{
"/employee/login",
"/employee/logout",
"/backend/**",
"/front/**"
};
boolean res = just(s,requestURI);
if (res){
log.info(requestURI +"不是拦截路径");
filterChain.doFilter(request,response);
return;
}
if (request.getSession().getAttribute("employee")!=null){
log.info("是拦截路径,用户已经登录,id为:{}",request.getSession().getAttribute("employee"));
filterChain.doFilter(request,response);
return;
}
response.getWriter().write(JSON.toJSONString(R.error("NOTLOGIN")));
log.info("用户未登录,拦截路径为:{}",requestURI);
return;
}
public boolean just(String s[],String requestURI){
for (String uri:s) {
boolean match = PATH_MATCHER.match(uri, requestURI);
if (match){
return true;
}
}
return false;
}
}
|
新增员工
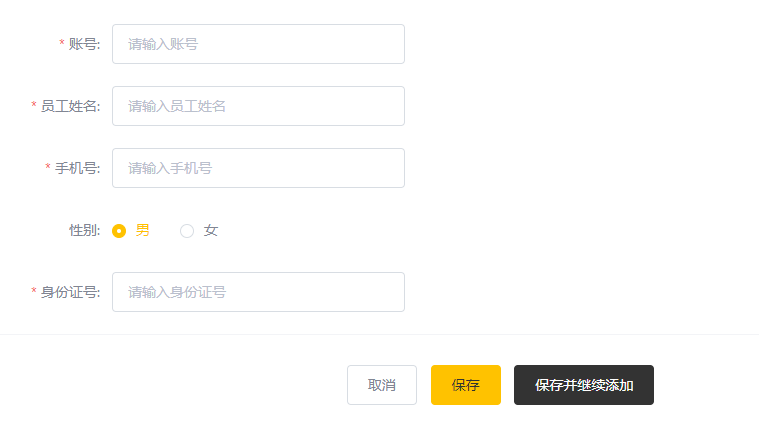
添加新增员工的信息,点击保存,提交给服务器。
代码为:
1
2
3
4
5
6
7
8
9
10
11
12
13
14
15
16
17
18
19
20
21
22
23
24
25
26
|
@PostMapping
public R<String> saveEmployee(HttpServletRequest request, @RequestBody Employee employee){
employee.setPassword(DigestUtils.md5DigestAsHex("123456".getBytes()));
employee.setCreateTime(LocalDateTime.now());
employee.setUpdateTime(LocalDateTime.now());
Long userID = (Long)request.getSession().getAttribute("employee");
employee.setCreateUser(userID);
employee.setUpdateUser(userID);
employeeService.save(employee);
return R.success("保存成功");
}
|
但仅仅是上面的代码,还存在一些问题,就是我们规定该系统的用户名是唯一的,

当我们添加一样的用户名的时候,控制台显示错误。

解决这个问题;
(1)可以将代码中添加try..catch进行捕获异常,这种方式处理非常不好,因为后面我们这种添加操作会很多,这样我们就要处理很多遍。
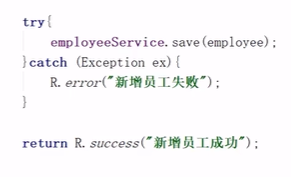
(2)推荐!!–使用异常处理器进行全局异常捕获,对整个项目进行捕获,不管是那个模块,只要出现这种异常就可以捕获。
定义一个全局异常处理器:GlobalExceptionHandler.java
(全局异常捕获有两种方式:Spring的AOP、 @ControllerAdvice结合@ExceptionHandler)
这里使用@ControllerAdvice结合@ExceptionHandler。
1
2
3
4
5
6
7
8
9
10
11
12
13
14
15
16
17
| @ControllerAdvice(annotations = {RestController.class, Controller.class})
@ResponseBody
@Slf4j
public class GlobalExceptionHandler {
@ExceptionHandler(SQLIntegrityConstraintViolationException.class)
public R<String> exceptionHandler(SQLIntegrityConstraintViolationException e){
if (e.getMessage().contains("Duplicate entry")){
String[] s = e.getMessage().split(" ");
String msg = s[2]+"已存在";
return R.error(msg);
}
return R.error("未知错误");
}
}
|
流程;

员工信息分页查询
使用mybatisplus中的分页插件进行实现。
(1)首先编写MybatisPlus的分页插件配置类
MybatisPlusConfig.java
1
2
3
4
5
6
7
8
9
10
11
12
13
14
15
16
|
@Configuration
public class MyBatisPlusConfig {
@Bean
public MybatisPlusInterceptor mybatisPlusInterceptor(){
MybatisPlusInterceptor mybatisPlusInterceptor = new MybatisPlusInterceptor();
mybatisPlusInterceptor.addInnerInterceptor(new PaginationInnerInterceptor());
return null;
}
}
|
(2)编写Controller
1
2
3
4
5
6
7
8
9
10
11
12
13
14
15
16
17
18
19
20
21
22
23
24
|
@RequestMapping("/page")
public R<Page> page(int page,int pageSize,String name){
Page pageInfo = new Page(page,pageSize);
LambdaQueryWrapper<Employee> queryWrapper = new LambdaQueryWrapper<>();
queryWrapper.like(StringUtils.isNotBlank(name),Employee::getName,name);
queryWrapper.orderByDesc(Employee::getUpdateTime);
employeeService.page(pageInfo,queryWrapper);
return R.success(pageInfo);
}
|
启用禁用员工账号功能
(1)编写启用禁用员工的Controller,也就是更新员工的信息,所以写为update,
1
2
3
4
5
6
7
8
9
10
11
12
13
14
|
@RequestMapping()
public R<String> update(HttpServletRequest request, @RequestBody Employee employee){
Long id = (Long) request.getSession().getAttribute("employee");
employee.setUpdateTime(LocalDateTime.now());
employee.setUpdateUser(id);
employeeService.updateById(employee);
return R.success("员工信息修改成功");
}
|
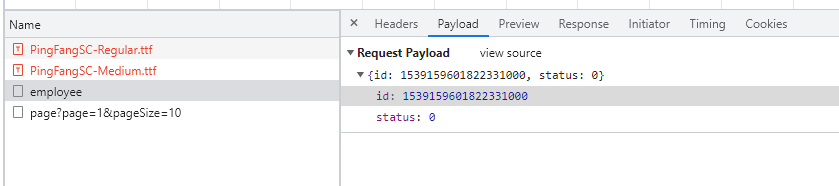
但以上这么写完之后,修改不成功,也不提示错误,原因是浏览器通过json字符串传递过去的id值与数据库中的id值不相同
数据库;

因此修改不成功,因为js对long类型的数据进行处理时丢失了精度,
如何解决:服务器给页面响应json数据的时候进行处理,将long数据类型转换为String字符串。
实现步骤:
(1)提供对象转换器JacksonObject,
1
2
3
4
5
6
7
8
9
10
11
12
13
14
15
16
17
18
19
20
21
22
23
24
25
26
27
28
29
30
31
32
33
34
35
|
public class JacksonObjectMapper extends ObjectMapper {
public static final String DEFAULT_DATE_FORMAT = "yyyy-MM-dd";
public static final String DEFAULT_DATE_TIME_FORMAT = "yyyy-MM-dd HH:mm:ss";
public static final String DEFAULT_TIME_FORMAT = "HH:mm:ss";
public JacksonObjectMapper() {
super();
this.configure(FAIL_ON_UNKNOWN_PROPERTIES, false);
this.getDeserializationConfig().withoutFeatures(DeserializationFeature.FAIL_ON_UNKNOWN_PROPERTIES);
SimpleModule simpleModule = new SimpleModule()
.addDeserializer(LocalDateTime.class, new LocalDateTimeDeserializer(DateTimeFormatter.ofPattern(DEFAULT_DATE_TIME_FORMAT)))
.addDeserializer(LocalDate.class, new LocalDateDeserializer(DateTimeFormatter.ofPattern(DEFAULT_DATE_FORMAT)))
.addDeserializer(LocalTime.class, new LocalTimeDeserializer(DateTimeFormatter.ofPattern(DEFAULT_TIME_FORMAT)))
.addSerializer(BigInteger.class, ToStringSerializer.instance)
.addSerializer(Long.class, ToStringSerializer.instance)
.addSerializer(LocalDateTime.class, new LocalDateTimeSerializer(DateTimeFormatter.ofPattern(DEFAULT_DATE_TIME_FORMAT)))
.addSerializer(LocalDate.class, new LocalDateSerializer(DateTimeFormatter.ofPattern(DEFAULT_DATE_FORMAT)))
.addSerializer(LocalTime.class, new LocalTimeSerializer(DateTimeFormatter.ofPattern(DEFAULT_TIME_FORMAT)));
this.registerModule(simpleModule);
}
}
|
(2)在WebMvcConfig配置类中扩展Spring mvc的消息转换器,
1
2
3
4
5
6
7
8
9
10
11
12
13
14
15
|
@Override
protected void extendMessageConverters(List<HttpMessageConverter<?>> converters) {
MappingJackson2HttpMessageConverter messageConverter = new MappingJackson2HttpMessageConverter();
messageConverter.setObjectMapper(new JacksonObjectMapper());
converters.add(0,messageConverter);
}
|
编辑员工信息
代码为:
1
2
3
4
5
6
| @GetMapping("/{id}")
public R<Employee> getById(@PathVariable Long id){
log.info("根据id查询员工信息。。。");
Employee byId = employeeService.getById(id);
return R.success(byId);
}
|